How to Grow an Apple Tree
For the average person, apples are probably the easiest tree to grow, especially if you live at temperate latitudes. So, understandably, they are extremely popular among keen gardeners.
Over the years, horticulturalists developed thousands of different kinds of apples. Each has a unique flavor, texture, and aroma.
You can categorize apples into two groups: dessert and cooking. Dessert apples are generally sweet and you can eat them raw. Cooking apples are sour but easy to grow and great for putting into puddings with added sugar. Some varieties are dual-purpose, meaning that you can eat them raw and put them in a crumble.
 How To Grow An Apple Tree From Scratch
There are several ways of growing an apple tree, but one of the most fun is to do it from scratch. There is nothing more magical than taking a pip from a regular apple, planting it in the ground, and then waiting for it to grow into a mighty tree.
Most professionals recommend that you buy a named cultivar sapling from a garden store when trying to grow your own apple tree. You can grow from a pip, but as you’ll discover, there are some potential downsides to allowing mother nature to take its course. If you’re growing from a seedling, please skip to step 6.
Step 1: Collect The Pips
Collecting the pips is the first stage if you’re growing a tree from scratch. Take an apple from an existing tree, discard the flesh, and then collect the pip. You’ll want around a dozen.
Please be aware that the resulting tree might bear a different type of fruit from the one the pip came from. That’s because there is a lot of variation from one generation of apple trees to the next. Just as human children differ from their parents, so too do new apple trees. It’s nature’s way of ensuring variety and balance. For instance, you could plant a pip from a Cox apple, but it might grow into a tree that bears fruit with an entirely different character.
You should also be aware that planting an apple tree from the pip takes a long time. It could be many years before you finally get fruit from it. That’s why many people prefer to skip this step and just use a cultivar from a nursery.
Step 2: Dry Your Seeds
If planting from the pip, the next step is to dry your seeds and get rid of any lingering pieces of fruit clinging to them. Air drying is fine until there is no longer any moisture on the shell.
Step 3: Place The Seeds Under A Damp Paper Towel
Once the seeds dry, place them inside an air-tight container. It doesn’t matter what this container is, so long as it prevents air from going in and out. Tupperware is fine.
Scatter the pips on the bottom of the container and then place a wet paper towel over the top. Then put the seeds in the refrigerator, keeping the temperature at around 40 F. The idea here is to simulate winter conditions.
You’ll need to keep the seeds in the refrigerator for around 70 to 80 days. Doing this prepares the pips for germination.
Make sure that you regularly check the container to ensure that the paper towel is still damp.
Step 4: Pot Your Sprouts
The next step is to carefully take the sprouting apple pips and place them in a pot that provides them with optimal growing conditions.
You should plant seeds outside in either a seedbed or a pot. Use neutral pH potting mix. Then create a small depression in the soil, one to two times the size of the sprouting seed itself.
You should not use fertilizers for apple trees. If your sprouts are failing, just add some compost or leaf mulch.
Once you place the seeds in the small divots, cover them and gently pat down the surrounding soil.
Most growers water the soil immediately to keep it moist.
Step 5: Keep The Pot At Room Temperature
Place your pot somewhere warm with access to plenty of sunlight throughout the day. If you live in the northern hemisphere, windowsills facing south will provide sufficient sunlight.
You should notice that your seedlings continue to grow and begin to produce small leaves. After a few weeks, the seedling will grow larger and stronger. Sometimes, seedlings will outgrow their pots. In this case, simply transfer to a new pot.
Step 6: Plant Your Seedling Outside
Once the seedling is strong enough and there is no chance of another winter frost, plant it outside. When doing so, you will need to think carefully about where to put it.
First, consider the level of sunlight. To grow properly, apple trees need full sun – at least six hours or more of daylight per day.
Apple trees also grow best in relatively dry soil, so don’t place seedlings in locations that regularly get soggy.
You also need to ensure that you place apple trees far enough apart. Fully-grown trees can reach between 20 and 30 feet tall with roots that sprawl out around 30 feet. Ideally, you should place your trees at this distance from each other.
Before you put the seedling in the ground, clear away any weeds in the surrounding area. If you leave these in place, they will compete with the apple tree and could prevent it from flourishing.
Dig a hole around two feet wide and deep. Then carefully remove the seedling from its current container, making sure to preserve the roots and place it in the hole. Then fill in the hole with the broken-up soil, patting it in loosely.
Keeping the soil surrounding the roots loose helps the sapling grow out its root system. If you leave the soil compacted, then the apple tree will struggle to grow.
You do not need to apply any fertilizer.
Watering the tree after you plant it helps to prevent the formation of air pockets.
Step 7: Apply Mulch
Spread mulch in a three-foot circle around the sapling. Doing this will help prevent other plants from competing with the sapling and also helps to keep moisture in the soil.
Step 8: Take Care Of Your Apple Tree
Once the tree is in the ground, watered, and mulched, you then need to take care of it so that it can mature to adulthood.
Warding off pests
Some animals like to eat the leaves and fruits of apple trees. For this reason, you’ll need to protect young trees. Deer, for instance, will often consume the buds of apple trees and can sometimes damage the trunks. You can protect trees using chicken wire. Just cut a loop and wrap it around the outside of the tree. If growing apple trees in the summer, you can use goo-coated balls to attract apple maggots and prevent them from damaging fruits.
Watering
If the tree is small, you should water it every ten to twelve days or so. Don’t water to the point where the soil becomes soggy: damp will suffice. As the tree gets older, you can water it less frequently. If it is a long, dry, and hot summer, watering every two weeks can help ensure a better harvest.
Add fertilizer
As your tree gets older, it will eventually deplete the surrounding soil of nitrogen and other compounds. Some people, therefore, add 10-10-10 fertilizer under the canopy of the tree. Before adding fertilizer, test the nitrogen level in the soil. If there’s too much, then it will limit fruit production.
Train your tree
The idea of training a tree sounds a little strange, but if you can prune it in the right way, it will reward you. If you just let nature take its course, apple trees will grow in all sorts of directions. Ideally, you want main branches coming off the trunk to be at 35-degree angles or better so that they’re facing more “upwards.” Some apple tree branches will go out horizontally from the tree. You can train branches to grow at the correct angle by hoisting them into the air by tying ropes to other branches. If there are too many limbs packed into a single location competing with each other, be sure to prune them back.
Thin excessive fruiting
Too much fruit can actually harm your apple tree by causing branches to bend downward and damaging the quality of apples when they ripen. You should only have one or two apples per cluster, spaces around 6 to 8 inches apart. More than that could damage the tree and reduce your yields. You can reduce the number of apples that fruit by cutting off the flowers in the spring.
Harvesting Apples
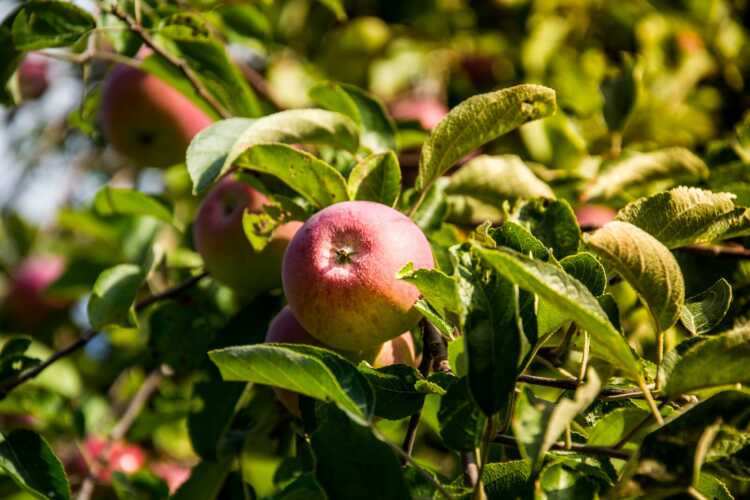
Apples start to become available for harvesting around August. Most fall in September and October. Some varieties will continue producing ripened fruit well into November.
When ready, apples should fall off the tree following a gentle shake. If they don’t, give them another week or so and try again. You can use netting around the base of the tree to catch them and prevent bruising.


